Photographs that look three dimensional when viewed through colored glasses.
*new! some animated 3D pictures - these are the two images (left and right) superimposed on each other. Some of them have been hand colored, instead of being green or blue and red. (added 12-31-09)
2.
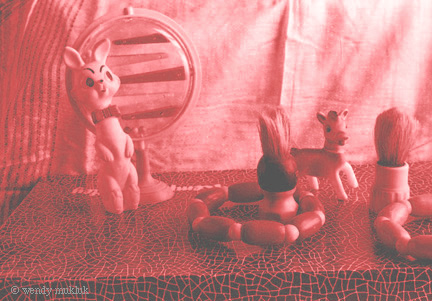
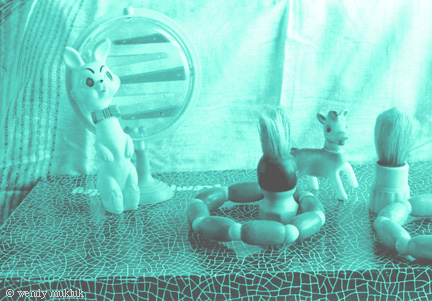
the two images in red and green (simulated in Photoshop).
the left image is in green,
the right image is in red.
The images should be light so that
the colors of the 3D glasses lenses
can cancel them out.
3.
a 3D offset lithograph
printed from two plates,
one in red ink and one in green.
Other processes, such as
gum bichromate or computer graphics
can make similar images.
This image looks 3D through 3D glasses in real life
with red lens on the right,
green lens on left.
etc.
computer graphic version
the simulated red and green images from above
superimposed in Photoshop (about 50% transparency).
Here are some newer examples; still not great ones. The original left and right photographs were scanned and the colors added in Photoshop. The two colored images were superimposed in Photoshop, with the top layer at 50% opacity. You need to get the colors right and the images positioned correctly for it to work. You might need to move the images closer together or farther apart, and make the colors lighter or darker or closer in color to the glasses.
3D Pictures
Two pictures of the same subject taken 2 inches apart are printed in opposite colors. When viewed through glasses with an opposite color in each lens, the lens colors cancel out part of the picture, and one eye sees one image while the other eye sees a slightly different image. The brain reconstructs these into a "three dimensional" image.
Take two pictures of the subject, two inches apart. Use a ruler or tape measure and move the camera (or the tripod) two inches along it. Keep the camera about the same distance from the subject. Try to arrange things with some depth, so you have something in the foreground as well as something farther back. (The examples shown here are not the best, but they happened to be what I have on hand). A 3D camera, with two lenses, is perfect for this, and then you can even take action shots.
Develop and/or print your two photographs.
Make negatives or scans, depending upon how you are going to make the final images. Make large copy negatives, the size of your final print, for alternative photography and most printmaking processes. Enlarge small negatives onto film in your enlarger, or use a copy camera to make big negatives, or photocopy your prints for paper negatives, or scan your prints or negatives and make a computer file or a printout.
Print the images in contrasting colors, one superimposed on the other.
Red and Green,
or Orange and Blue work well.
Many mediums
lend themselves to this -- gum bichromate, photo etching,
photo offset or traditional photo lithography,
photo silkscreen, or computer graphics (programs
such as Photoshop, Illustrator, Painter, etc.).
The images or
inks should be fairly transparent, so that the image underneath
shows through some of the image on top. It doesn't matter
if the left or right is on the bottom or top.
The colors and
final prints should be light, so that the colors in the 3D
glasses can cancel them out. If you make the print too dark,
you will still be able see both images in both eyes through
the glasses and it won't look very 3D.
Try to match the
colors of your inks to the colors of your 3D glasses lenses.
It doesn't have to be exact, but if your ink or image colors
don't match the glasses lens colors very well, then the
image might not look very 3D. In the examples above,
the offset picture looks fairly 3D, but the colors in
the Photoshop image aren't as good of a match with
the 3D glasses I'm using, and doesn't look very 3D at
all with my 3D glasses; I can still see both overlapping images.
Test your ink
or screen colors by looking at an image in those colors
on a white background through a piece of the mylar or cellophane
you are using for a "lens" for your 3D glasses.
Look at a green image through the green mylar, and so on.
If the image is hard to see or invisible, the colors are
well matched and light enough, and the 3D effect is more
likely to work.
Print the ink
colors the same colors as the corresponding lens, for
example, print the right image red, and then make the right
lens of the glasses red. (If you get the colors mixed up,
try looking through the cardboard glasses turned inside
out; then the image should look 3D if it didn't with the
glasses right way around.) Print registration does not
have to be exact. For the images above, the outer edges
of the film frames were roughly aligned. If something
more precise is desired, try including a grid, ruler,
pattern, registration marks, or similar items in the edge
of the frame, use these to register the prints, then either
include these as part of the design, or trim off in the
final printing.
See also the
pages on
registration,high contrast film,
and gum bichromates
for a bit more information.
Other than that, search the web, and I highly recommend checking your
local public library. There are many good books out there
on printmaking and photography that cover more subjects
and in greater depth than what is on the web yet.
Get some 3D glasses. Sometimes you can find red and green glasses at novelty shops, or they turn up in advertisements. You can make your own 3D glasses out of cardboard and colored cellophane or mylar.
Trace a pair of glasses,
or measure your face, for a guide, if desired.
Cut out two glasses
frames, with holes for the lenses, from thin or medium
cardboard (railroad board is good, and comes in many
colors).
Cut out pieces
of colored cellophane or mylar for the lenses,
a bit bigger than the holes in the glasses frames.
Glue one red
piece and one green piece onto one cardboard frame,
then glue the second frame over it, making a cardboard
sandwich that holds the colored lenses in place.
cut out simple cardboard shapes like this,
glue in pieces of contrasting colored mylar or cellophane for the lenses, bend at the dotted lines to wear.
View the print. Sometimes it works better to un-focus your eyes slightly.
![[PICTURE - 3D print]](box-lr.jpeg)
![[PICTURE - 3D print]](box-lr-sim.jpeg)
![[PICTURE - 3D print]](box.jpeg)
![[PICTURE - 3D print]](box-3d-sim.jpeg)

![[PICTURE - 3D glasses]](glasses.gif)